blogspot visit counter

Thursday, 21 March 2013

run-java-program-from-command-prompt

how to run java program from command prompt
First we check java is installed in our pc or notOpen Command prompt -> type cmd ->press Enter-> type
java -version
show Example

If java in not install then follow this instruction as show below

how to run java program from command prompt Step by Step

1. Download JDK from windows.
first step is downloading correct version of JDK and correct installer for your machine. Since Java is supported for multiple platform you see lot of installer available for JDK. if you are running on windows PC than you should download Windows Installer of 32 bit machine since most of Windows desktop and laptop are 32 bit and until you know that its for Windows Server which can be 64 bit. If you are running on RedHat linux or Ubuntu than you can also download tar file.

What is difference between JDK,JRE and JVM?

 What is JIT compiler?

JDK DOWNLOAD LINK->JDK Download Link
2. Second step is to installing Java
If you are running on Windows PC than installing Java is just a cakewalk. just double click on Installer and it will install Java in your machine. it usually creates a folder under program files/Java/JDK_version , this folder is important because in many script this is refereed as JAVA_HOME and we will specify an environment variable JAVA_HOME pointing to this folder. If you are running in Linux or any Unix machine including AIX, Solaris etc. you just need to extract tar file and it will put all the binary in a folder this will be your JAVA_HOME in Linux.
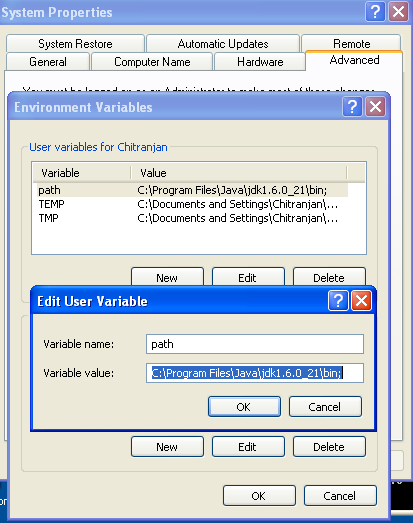
3. Third Step is Setting PATH for Java.
for setting PATH you just need to append JAVA_HOME/bin in PATH environment variable. For step by step guide and details How to Set PATH for Java in Windows, Linux and Unix.

difference between Java platform and other platforms
java Path screen short
 Wirte Click on My computer and select Property


4. Testing Java PATH
Before you run your first Java program its better to test PATH for Java. Now open a command prompt in Windows just go to "Run" and type "cmd". Now type "java" or "javac" if you see large output means Java is in PATH and you are ready to execute Java program.

Example

5. Fifth step is to write your first Java program
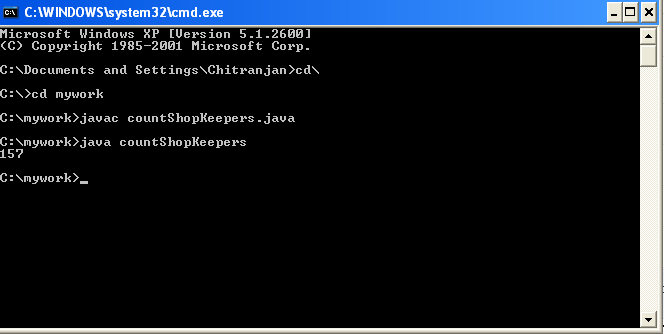
Best program to quickly test anything is countShopKeepers , just type below program and save it into file called countShopKeepers.java

class countShopKeepers
{
    public static void main(String[] args)
    {
        int numberOfNewShopKeepers = 70;
        int numberOfNewReturningKeepers = 87;
        int numberofshoopers = 0;
        numberofshoopers = numberOfNewShopKeepers + numberOfNewReturningKeepers;

        System.out.println(numberofshoopers);

    }
}
save program   countShopKeepers.java  in c drive within mywork folder

Run Program From command frompt

open command

Wednesday, 20 March 2013

what is mongodb

what is mongodb

what is mongodb

MongoDB is the leading NoSQL database, designed for how we build and run applications today. MongoDB empowers organizations to be agile and scalable. It helps them enable new types of applications, improve customer experience, accelerate time to market and reduce total cost of ownership (TCO).
MongoDB is a general purpose, open-source database. MongoDB features:
  • Document data model with dynamic schemas
  • Full, flexible index support and rich queries
  • Auto-Sharding for horizontal scalability
  • Built-in replication for high availability
  • Text search
  • Advanced security
  • Aggregation Framework and MapReduce
  • Large media storage with GridFS
  •  

 MongoDB is an open-source, high-performance, document-oriented database. Documents are JSON-like data structures stored in a format called BSON (bsonspec.org). Documents are stored in collections, each of which resides in its own database. Collections can be thought of as the equivalent of a table in an RDBMS. There are no fixed schemas in MongoDB, so documents with different “shapes” can be stored in the same collection. 

MongoDB features full index support (including secondary and compound indexes); indexes are specified per collection. There is a rich, document-based query language (see reverse) that leverages these indexes. MongoDB also provides sophisticated atomic update modifiers (see reverse) to keep code contention-free. 

Clustered setups are supported, including easy replication for high availability, as well as auto-sharding for write-scaling and large data-set sizes.

Organizations of all sizes use MongoDB to quickly and easily develop, scale and operate applications. Instead of storing data in rows and columns as one would with a relational database, MongoDB stores a binary form of JSON documents (BSON).

Dev’Backup/Restore
MongoDB ability to dumpadb/collection empowers developer
Possible to restore part of the production data set simply on a development box
Backup a MongoDB by collections in S3,recoverondev’platform in a matter of minutes
What we expect from our NoSQLDBMS and our compromise No downtime
:Hig havailability
No migrationcost Easy to deploy,redeploy,replicate,reconfigure
Quietly losing seconds of writes is preferable to weekly minutes-long maintenances periods
minutes-long unscheduled downtime and manual failover in case of hardware failure.

About MongoDB

MongoDB is a document-oriented database and each document has its own structure. Unlike a RDBMS in which each record must conform to the structure of its table, each document in MongoDB can have a different structure; you don’t have to define a schema for documents before saving them in the database.
MongoDB groups document objects into collections. You can think of a collection as a table like you would create in a RDBMS, but the difference as I said before is that they won’t force you to define a schema before you can store something.

With MongoDB, you can embed a document inside another one, which is really useful for cases where there is a one-to-one relationship. In a typical RDBMS you’d need to create two tables and link them together with a foreign key to achieve the same result. MongoDB doesn’t support joins, which some people see as a con. But if you organize your data correctly then you’ll find you don’t need joins, which is a pro since you’ll benefit from very high performance.

It’s worth mentioning the aim of MongoDB and NoSQL isn’t to kill off RDBMS. RDBMSs are still a very good solution for most of the development world’s needs, but they do have their weaknesses, most noticeably the need to define a rigid schema for your data which is one problem NoSQL tries to solve.

Example is Coming Soon Related to MongoDB

Tuesday, 19 March 2013

On Page Load How I Can Send Email using Asp.net

On Page Load How I Can Send Email using Asp.net
In my previous Article I explained how to Sending email with GMail's SMTP server in ASP.NET.
This example shows how to Send Email Using Gmail In ASP.NET. If you want to send mail using Gmail account or it's SMTP server in ASP.NET application if you don't have a working smtp server to send mails than sending e-mail with Gmail is best option.

using System.Net.Mail;
After that write the following code in button click
protected void  Page_Load(object sender, EventArgs e)
{
try
{
string from=Request["from"];
string to=Request["to"];
string password=Request["password"]; 
string subject=Request["subject"];
string Body=Request["Body"]; 
MailMessage Msg = new MailMessage();
// Sender e-mail address.
Msg.From = new MailAddress(from);
// Recipient e-mail address.
Msg.To.Add(txtTo.Text);
Msg.Subject = txtSubject.Text;
Msg.Body = txtBody.Text;
// your remote SMTP server IP.
SmtpClient smtp = new SmtpClient();
smtp.Host = "smtp.gmail.com";
smtp.Port = 587;
// pass the gmail user id and password
smtp.Credentials=new System.Net.NetworkCredential(from,password);
smtp.EnableSsl = true;
smtp.Send(Msg);
Response.Write("send");
// get the message

}
catch (Exception ex)
{
// Response.Write(ex.Message);
}
}
                   
Here we used smtp.Port=587 this is the port number which is used by gmail that’s why we used this port number. In some situations if you get any error regarding security remove smtp.EnableSsl = true;
Example

  In this example normal you can write a url as shown below .only you have to change the eamil id and password .

localhost:2796/emailsending/mailsender.aspx?from=xyz@gmail.com&to=avc@gmail.com&password=11123344&subject=hello&Body=this is a col example


Download sample code attached

how to Sending email with GMail's SMTP server in ASP.NET

how to Sending email with GMail's SMTP server in ASP.NET
Small Introduction:
Sending email is a very common task in any web application. In almost every web application (web site), their will atleast be an occassion to send email in any fashion.
sending email on page load passing values in query string
The SmtpMail class in ASP .NET provides properties and methods for sending messages using the Collaboration Data Objects for Windows we will see, how can we send email from an ASP .NET page.
Description:
now I will explain how to implement mail sending concept with attachment in asp.net. To implement this concept first we need to following reference to our application System.Web.Mail namespace What is System.Web.Mail
The SmtpMail class in ASP .NET provides properties and methods for sending messages using the Collaboration Data Objects for Windows 2000 (CDOSYS) message component In this article, we will see, how can we send email from an ASP .NET page. In a nut shell, today, we will be looking into the following:

. What we need to send Email from an ASP .NET?
. How to send an email from an ASP .NET page?
. What is new in sending email? (SmtpMail.SmtpServer)
. How can we send attachments in an email?

After that design your aspx page like this
<html xmlns="http://www.w3.org/1999/xhtml">
<head id="Head1" runat="server">
<title>Send Mail using with gmail crendentials in asp.net</title>
</head>
<body>
<form id="form1" runat="server">
<div>
<table style=" border:1px solid" align="center">
<tr>
<td colspan="2" align="center">
<b>Send Mail using gmail credentials in asp.net</b>
</td>
</tr>
<tr>
<td>
Gmail Username:
</td>
<td>
<asp:TextBox ID="txtUsername" runat="server"></asp:TextBox>
</td>
</tr>
<tr>
<td>
Gmail Password:
</td>
<td>
<asp:TextBox ID="txtpwd" runat="server" TextMode="Password"></asp:TextBox>
</td>
</tr>
<tr>
<td>
Subject:
</td>
<td>
<asp:TextBox ID="txtSubject" runat="server"></asp:TextBox>
</td>
</tr>
<tr>
<td>
To:
</td>
<td>
<asp:TextBox ID="txtTo" runat="server"></asp:TextBox>
</td>
</tr>
<tr>
<td valign="top">
Body:
</td>
<td>
<asp:TextBox ID="txtBody" runat="server" TextMode="MultiLine" Columns="30" Rows="10" ></asp:TextBox>
</td>
</tr>
<tr>
<td>
</td>
<td>
<asp:Button ID="btnSubmit" Text="Send" runat="server" onclick="btnSubmit_Click" />
</td>
</tr>
</table>
</div>
</form>
</body>
</html>
After that add this namcespace in your codebehind
using System.Net.Mail;
After that write the following code in button click
protected void btnSubmit_Click(object sender, EventArgs e)
{
try
{
MailMessage Msg = new MailMessage();
// Sender e-mail address.
Msg.From = new MailAddress(txtUsername.Text);
// Recipient e-mail address.
Msg.To.Add(txtTo.Text);
Msg.Subject = txtSubject.Text;
Msg.Body = txtBody.Text;
// your remote SMTP server IP.
SmtpClient smtp = new SmtpClient();
smtp.Host = "smtp.gmail.com";
smtp.Port = 587;
smtp.Credentials=new System.Net.NetworkCredential(txtUsername.Text,txtpwd.Text);
smtp.EnableSsl = true;
smtp.Send(Msg);
Msg = null;
Page.RegisterStartupScript("UserMsg", "<script>alert('Mail sent thank you...');if(alert){ window.location='SendMail.aspx';}</script>");
}
catch (Exception ex)
{
Response.Write(ex.Message);
}
}
                   
Here we used smtp.Port=587 this is the port number which is used by gmail that’s why we used this port number. In some situations if you get any error regarding security remove smtp.EnableSsl = true;
Example


Download sample code attached


Saturday, 16 March 2013

jquery and javascript


What is jQuery ?

jQuery is a fast and concise JavaScript Library created by John Resig in 2006 with a nice motto: Write less, do more.
jQuery simplifies HTML document traversing, event handling, animating, and Ajax interactions for rapid web development.
jQuery is a JavaScript toolkit designed to simplify various tasks by writing less code. Here is the list of important core features supported by jQuery:
  • DOM manipulation: The jQuery made it easy to select DOM elements, traverse them and modifying their content by using cross-browser open source selector engine called Sizzle.
  • Event handling: The jQuery offers an elegant way to capture a wide variety of events, such as a user clicking on a link, without the need to clutter the HTML code itself with event handlers.
  • AJAX Support: The jQuery helps you a lot to develop a responsive and feature-rich site using AJAX technology.
  • Animations: The jQuery comes with plenty of built-in animation effects which you can use in your websites.
  • Lightweight: The jQuery is very lightweight library - about 19KB in size ( Minified and gzipped ).
  • Cross Browser Support: The jQuery has cross-browser support, and works well in IE 6.0+, FF 2.0+, Safari 3.0+, Chrome and Opera 9.0+
  • Latest Technology: The jQuery supports CSS3 selectors and basic XPath syntax.

Friday, 15 March 2013

Install Mongo on CentOS,Fedora, Ubuntu & Debian

Install MongoDB 2.0.4 on RHEL CentOS Fedora Ubuntu & Debian

Install MongoDB 2.0.4 on RHEL CentOS Fedora Ubuntu & Debian

This howto guide shows how to install MongoDB 2.0.4 on RHEL 6.2/6.1/6/5.8, CentOS 6.2/6.1/6/5.8, Fedora 16/15/14/13/12, Ubuntu 12.04/11.10/11.04/10.10/10.04 and Debian using MongoDB own YUM repositories for RHEL, CentOS and Fedora and apt-get for Ubuntu and Debian.

What is MongoDB?

MongoDB (from "humongous") is an open source scalable, high-performance and schema-free document-oriented NoSQL database system written in C++. MongoDB bridges the gap between key-value stores (which are fast and highly scalable) and traditional RDBMS systems (which provide structured schemas and powerful queries).

MongoDB Features

  1. Document-oriented storage (the simplicity and power of JSON-like data schemas)
  2. Dynamic queries
  3. Full index support, extending to inner-objects and embedded arrays
  4. Query profiling
  5. Fast, in-place updates
  6. Efficient storage of binary data large objects (e.g. photos and videos)
  7. Replication and fail-over support
  8. Auto-sharding for cloud-level scalability
  9. MapReduce for complex aggregation
  10. Commercial Support, Training, and Consulting

Why MongoDB?

  1. Document-oriented
    1. Documents (objects) map nicely to programming language data types
    2. Embedded documents and arrays reduce need for joins
    3. Dynamically-typed (schemaless) for easy schema evolution
    4. No joins and no multi-document transactions for high performance and easy scalability
  2. High performance
    1. No joins and embedding makes reads and writes fast
    2. Indexes including indexing of keys from embedded documents and arrays
    3. Optional streaming writes (no acknowledgements)
  3. High availability
    1. Replicated servers with automatic master failover
  4. Easy scalability
    1. Automatic sharding (auto-partitioning of data across servers)
      1. Reads and writes are distributed over shards
      2. No joins or multi-document transactions make distributed queries easy and fast
    2. Eventually-consistent reads can be distributed over replicated servers
  5. Rich query language
Install MongoDB 2.0.4 on RHEL 6.2/6.1/6/5.8, CentOS 6.2/6.1/6/5.8, Fedora 16-12, Ubuntu 12.04/11.10/11.04/10.10/10.04 and Debian

How to Install MongoDB 2.0.4 RHEL, CentOS and Fedora

Step 1: Adding 10gen MongoDB Repository

Add 10gen Mongodb-repo (yum-installable RPM packages) on RHEL 6.2/6.1/6/5.8, CentOS 6.2/6.1/6/5.8, Fedora 16-12 for x86 and x86_64 platforms.

For all 32-bit RPM-based distros with yum, put this at /etc/yum.repos.d/10gen.repo:
[10gen]
name=10gen Repository
baseurl=http://downloads-distro.mongodb.org/repo/
redhat/os/i686
gpgcheck=0
For all 64-bit RPM-based distros with yum, put this at /etc/yum.repos.d/10gen.repo:
[10gen]
name=10gen Repository
baseurl=http://downloads-distro.mongodb.org/repo/
redhat/os/x86_64
gpgcheck=0

Step 2: Installing MongoDB 2.0.4

Installing MongoDB Database Server on RHEL 6.2/6.1/6/5.8, CentOS 6.2/6.1/6/5.8, Fedora 16-12 for x86 and x86_64 platforms using YUM.
yum install mongo-10gen mongo-10gen-server
Note: for users upgrading from older (pre-2/2011) packaging scheme, it may be necessary to uninstall your existing "mongo-stable", "mongo-stable-server", "mongo-unstable", "mongo-unstable-server" packages before installing the latest mongo-10gen, mongo-10gen-server pacakges.

Step 3: Configure MongoDB Database Server

Open and edit /etc/mongod.conf file with VI Editor. Verify and set basic settings, before starting MongoDB Database Server.
vi /etc/mongod.conf
logpath=/var/log/mongo/mongod.log
port=27017
dbpath=/var/lib/mongo

Step 4: Starting MongoDB Database Server

/etc/init.d/mongod start
## OR ##
service mongod start

Step 5: Testing MongoDB Database Server

Testing with MongoDB command line client.
mongo

Step 6: Executing MongoDB Basic Commands

> show dbs
> show collections
> show users
> use &lt;db name&gt;

Step 7: Starting & Stopping MongoDB

Here is a quick reference to the commands that control the execution of the mongod server process:
service mongodb status 
service mongodb stop
service mongodb start
service mongodb restart
## OR ##
/etc/init.d/mongod status
/etc/init.d/mongod stop
/etc/init.d/mongod start
/etc/init.d/mongod restart

Step 8: Opening MongoDB Port on Firewall

Open file /etc/sysconfig/iptables and add the following line at the bottom and restart iptables.
-A INPUT -m state --state NEW -m tcp -p tcp --dport 27017 
-j ACCEPT
/etc/init.d/iptables restart
## OR ##
service iptables restart

Step 9: Testing MongoDB Remote Connection

mongo serverip:port/databasename
## Example ##
mongo 192.168.1.21:27017/ravisaive

How to Install MongoDB 2.0.4 on Ubuntu and Debian

Step 1: Adding 10gen MongoDB source.list

The 10gen package contains the latest mongoDB version, add below lines at the bottom of the file “/etc/apt/sources.list” on Ubuntu 12.04/11.10/11.04/10.10/10.04 and Debian.

For Ubunut, put these below lines to “/etc/apt/sources.list”:
deb http://downloads-distro.mongodb.org/repo/ubuntu-upstart 
dist 10gen
For Debian, put these below lines to “/etc/apt/sources.list”:
deb http://downloads-distro.mongodb.org/repo/debian-sysvinit 
dist 10gen

step 2: Adding GPG Key

10gen package required GPG key, import it:
sudo apt-key adv --keyserver keyserver.ubuntu.com --recv 
7F0CEB10

step 3: Insalling MongoDB

sudo apt-get update 
sudo apt-get install mongodb-10gen

step 4: Starting MongoDB

sudo status mongodb
sudo stop mongodb
sudo start mongodb
sudo restart mongodb

step 5: Testing MongoDB

To verify it, just connect it with “mongo
mongo
In case you're facing any difficulties while setting up MongoDB Database Server, please share with us via comment.

Enable or Disable a Controls Like Button, Textbox, Checkbox

JavaScript - Enable or Disable a Controls Like Button, Textbox, Checkbox

JavaScript - Enable or Disable a Controls Like Button, Textbox, Checkbox

Categories:  Javascript | Jquery

                  
Introduction

Here I will explain how to enable or disable a button control in JavaScript or Enable/Disable a controls in JavaScript. 

Description:
  
In previous articles I explained JavaScript Enable/Disable button based on text in textboxes,
jQuery Shake image on mouse over, jQuery upload multiple files usingmultiple file upload plugin, jQuery fancy switch on and off effectsexampleand many articles relating to JavaScript, jQuery, asp.net. Now I will explain how to enable or disable a button control in JavaScript.
To set controls enable or disable in JavaScript we need to write the code like as shown below

Enable control in JavaScript
document.getElementById('btnButton').disabled = false;
Disable control in JavaScript
document.getElementById('btnButton').disabled = true;
If you want to see it in complete example check this code
<html xmlns="http://www.w3.org/1999/xhtml">
<head>
<title>Enable or Disable a control in javascript</title>
<script language="javascript" type="text/javascript">
//function to enable button if two textboxes contains text
function SetButtonStatus() {
var txt = document.getElementById('txtfirst');
//Condition to check whether user enters text in two textboxes or not
if (txt.value.length >= 1)
document.getElementById('btnButton').disabled = false;
else
document.getElementById('btnButton').disabled = true;
}
</script>
</head>
<body>
<div>
<input type="text" id="txtfirst" onkeyup="SetButtonStatus(this,'btnButton')"/>
<input type="button" id="btnButton" value="Button" disabled="disabled" />
</div>
</body>
</html>
Live Demo

For live demo enter text in textbox whenever we enter text button will enable otherwise it’s in disable mode


Enter Text  Button

Related Posts Plugin for WordPress, Blogger...